Wednesday, June 29, 2011

Be Faithful In Small Things

Had a little time last night so I decided to go work on one card I have wanted to do.  Our Daily Bread Designs’ challenge this week was to use one of their stamps to create your own background paper.  My friend, April, and I were talking earlier this week about how we did not have so many wonderful papers when we started stamping and we actually created most of our backgrounds.  In fact, you almost felt guilty if you used decorative paper instead of creating your own.  I decided it would be fun to stamp all of my own for this card.


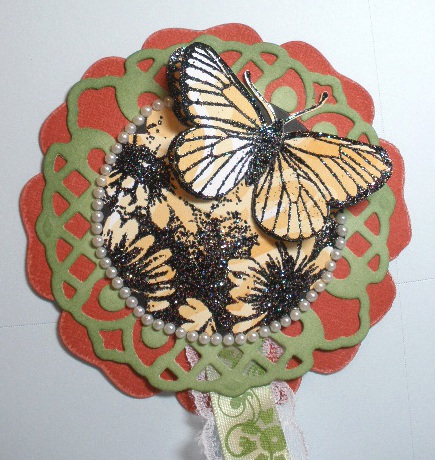
I started with a white, square card base.  I stamped and heat embossed the lovely butterfly branch image from Our Daily Bread Designs’ set called Faith.  I used white embossing on red cardstock, then sponged the edges with a dark red ink, rounded the corners, and layered it on the card.  I took a smaller white square and stamped and embossed the same image with red sparkly embossing powder.  I cut the square into three strips, rounded the corners, sponged on a little red ink, and spaced them across the card.  I cut the middle strip in half so I could spread it farther apart to make it appear longer.

For the image, I used the lovely flower filled watering can from their Happy Birthday set.  I stamped and embossed it in white on red cardstock, cut it out with a round Spellbinder die and popped it up with foam tape onto a white circle.  This is layered onto red cardstock cut out with a new doily die I just purchased.  Of course, I sponged the edges with dark red ink.  I ran some sheer, red, polka dot ribbon horizontally across the card and placed the image centered over this.

The verse is also from the Faith set and is stamped in red on white, cut out with a decorative, scalloped, oval die and the edges inked.  This is added with foam tape.  I added a double bow, using the same ribbon, and added a couple of paper roses.
This card is entered in the following challenges:

By the way, I have some real exciting news to share.  Come back here on Friday to see what it is.

The Shabby Tea Room Challenge Week #68 – My Favorite Things (Butterflies, Flowers, Ribbons, Bows, and Layers)
Charisma Cardz Challenge #25 – White and 1 Other color
Craft Us Crazy Wednesday Challenge #11 – Red, White, & Blue and/or Summer Theme
Craft Your Passion Challenge #64 – Seeing Red
Flutter By Wednesday Challenge #160 - Open Challenge
Lexi’s Creations Challenge #43 – A Bugs Life
Moxie Fab World:  The Stamp It! Cards Week Challenge – Stamping is the Predominant Element
Ooh La La Challenge #83 – Summer Flowers
Totally Stampalicious Color Challenge – Canadian Colors/Red and White

Tuesday, June 28, 2011

Sparkling Friendship

This has been a fun week so far because my oldest daughter is home.  She is here until Sunday when we have to take her to the airport to fly to Italy.  She was accepted at a music camp there and is the only violist from America.  I might be stressing for a while until I know she is safely there - better yet, when she gets safely home.  I am excited for her but very nervous, too.

We are having an in-house glitter challenge among the SNS designers.  Though I have always enjoyed a little glitter on my cards, I have truly fallen in love with all the sparkly delights available at Sparkle N Sprinkle.  I experimented with several different techniques (see the technique page) until I found what I wanted to do.


This card is a 5” x 7” white card base with layers of dark pink, light pink sparkle, and beautiful green decorative cardstock.  The next layer is dark green cardstock cut with a doily die.  I sponged green ink on the edges of this die and the decorative cardstock.  I cut some sticker paper,  using Spellbinder Label 13 and added Bubble Gum and Burgundy Glitz glitter using a piece of lace to create the design.  You can see this technique here.

For the image I used the sentiment “Being My Friend” from Sparkle N Sprinkle’s Thanks A Bunch set.  I stamped it in dark pink pigment ink on a piece of the pink sparkly cardstock and heat embossed it with Sparkle embossing powder (dont forget to always use the Static Free).  I cut it out with a die, sponged a little ink around the edges, and used foam tape to pop it in the center of the card.

My next sparkly element is the flowers.  These are the same kind of flowers I talked about making with my friend, Bonnie.  I cut these out of white cardstock, using Spellbinder’s Rose Creations die.  I used the three largest dies and the second smallest die for the large flower and the three smallest dies for the smaller flowers and then cut a variety of sizes of leaves.  I colored each flower and leaf on both sides with shimmering water colors.  While they were still damp, I used a large tipped stylus and literally mashed down on them on top of a mouse pad.  I start at the ends and work around the flower or leaf, slowly moving to the middle.  When you press down in the middle it pulls the whole flower together to give you the shape.  After they dried I added Starfire glitter using SNS Brushable Glue.  Go here to see a video of this technique.  After this had dried, I brushed a little more glue just to the edges of each petal and added Burgundy Glitz glitter.  Once again I let it dry, then used SNS Dimensional Glue to combine the flowers.  The painting, glue, and glitter do stiffen them but you can still bend and mold them slightly.  You can also put them together using a brad but I usually use the glue if I plan to add some other embellishment, such as the pink pearls I used.  I added the flowers around the sentiment and added a few leaves.  I had planned to add glitter to the leaves, too, but they were already so shimmery and I did not want to take away from the areas that already had glitter. 

For final touches I added some ribbon to two of the corners.  I had some pink jeweled swirls I wanted to add but I needed to make two cards and I only had one set of the swirls.  I decided to add pearls to the second card and guess what.  I liked it even bettter.  I thought I would still show you the one with the jewels.


This card is entered in the following challenges:
Speedy the Cat’s Friends Challenge Week 61 – Make it Sparkle!
The Shabby Tea Room Challenge Week #68 – My Favorite Things (Flowers, Glitter, Colors)
Stampin For The Weekend Challenge #11 – My Favorite Things (Flowers, Glitter, Colors)
Art Impressions Stamps Challenge #21 – Handmade Flowers
Crafty Cardmakers Spotlight Challenge – Sentimental: Sentiment as Your Focus
Crafty Creations Challenges #124 – Let It Shine: Lots of Sparkly Things
Fussy and Fancy Friday Challenge – Case (I cased Lisette and was inspired by the flower and doily)
Ooh La La Challenge #83 – Summer Flowers
Top Tip Tuesday Challenge #40 - T is for… (Twinkle, Techniques, Three – three sets of three pearls/three in the three flowers, three in two different corners.  Two tips - Use the Static Guard and how to make flowers)

Monday, June 27, 2011

Fill Life With Happiness

I recently received a new stamp set from Sparkle N Sprinkle called Spanish Butterfly,  It comes with a variety of decorative solid images and also several sentiments in Spanish.  I decided one of these sentiments would be perfect to use for my next card.


I had in mind some decorative cardstock that I have had for a long time but never seemed to have the right use for it.  I even had to dig a bit to find it but it was worth looking for.  I used a tag die to cut out a window in the middle of the decorative cardstock.  I centered this over my deep yellow card base to help me know where to stamp my sentiment.  I stamped sentiment with Versamark ink and then removed the decorative layer before I heat embossed it with a cobalt blue embossing powder.

To add to the decorative cardstock layer I punched the corners and added faux stitching around the edges.  I made a double bow using two different colors of the seam binding that I dyed, one blue and the other green.  I placed this on the top of the card and then used foam tape to layer all of this onto the embossed card base.

I am once again attempting a “simple and clean” card but could not resist adding just one more touch.  It just needed a little bling so I added three small blue jewels on the bottom right hand side.  Oh, in case you do not speak Spanish, this sentiment reads “Fill Life With Happiness”.  This set also comes in an English version called Solid Butterfly.

This card was entered in the following challenges:
Speedy the Cat's Friends Challenge Week 61 - Make it SPARKLE!
A Spoon Full of Sugar Challenge #157 – Ribbon and Bows
Crafty Cardmakers Spotlight Challenge – Sentiments as Your Focus
Crafts and Me Challenge #40 – Stitches
The Crafty Pad Challenge #127 – Bold and Bright or Soft Pastels
Creative Inspirations Challenge #62 – Stitching, Faux or Real
Dutch Daire Card Challenges DDCC#118 – Clean and Simple
4 Crafty Chicks Challenge #43 – Clean and Simple
Moving Along With The Times Challenge #104 – Clean and Simple
Crazy 4 Challenges C4C93 – Sketch


Saturday, June 25, 2011

The Sunshine of Life

There are a lot of challenges this week asking for “clean and simple”.  I used to do more of that but now I think most of my cards kind of fall in the middle of the scale.  I sat down in my craft room with an idea in my mind, trying to do clean and simple.  Though it looks more complex, it really is just adding ink technique to the background and I stayed with the two layers and minimal embellishment requested by most.


I started by placing a round piece of paper with removable tape on the top right hand side of a piece of glossy cardstock and brayered the top two-thirds of the card.  I used torn post-it paper to mask off the bottom and a straight piece to mask off the top, then brayered the “water”.  Using more masking, I added the “land” by sponging black ink and added the “sand” with a combination of brayering and sponging.  I sponged dark blue and then a little black ink around all the edges.  For more info on techniques like this check here.

I removed the circle and stamped the Sun Wave image from Sparkle N Sprinkles Summer Swirl set with Versamark ink on glossy cardstock in the middle.  Then I brayered light blue over the top part of the card, including the circled area.  I lightly sponged some yellow ink over the sun and buffed the whole card lightly with a paper towel and heat set it to make sure it was all dry.  I used black StazOn ink to stamp the Sunshine of Life sentiment and the Swirl Umbrella, both from Sparkle N Sprinkle.

To add a little texture and sparkle, I sponged the sand lightly with Versamark ink, added Hit the Beach embossing powder, and heat set.  Then I used a glue pen to add Poolside embossing powder to the water and heat set.  I crossed some fibers on the top of the card and then ran ¼” double sided “Tear-ific” tape around the back of the card, leaving a small border extending past the card edge and layered it on a cream card base.  I sprinkled Blue Lightning glitter onto the edges of the double sided tape.

Pretty simple, right?

This card is entered in the following challenges:
Speedy the Cat's Friends Challenge Week 61 - Make it SPARKLE!
Stamptacular Sunday Challenge #116 – Fun in the Sun
Crafty Creations Challenge #124 – Sparkly Things
Dutch Dare Card Challenge #118 – Clean and Simple
4 Crafty Chicks Challenge #43 – Clean and Simple (no more than 2 layers)
Moving Along With The Times Challenge #104 – Clean and Simple
Sentmental Sundays Challenge #59 – Summery or Sparkly (plus a sentiment)
Top Tip Tuesday Challenge #39 – Cross It Challenge

Wednesday, June 22, 2011

On a Summer Day...

I worked on a fun card today.  I still do not have any of the Magnolia stamps but was able to use one of April’s to stamp this little sweetie a couple of times on different decorative cardstock so I could make this.  I had the image already stamped on white cardstock and cut it out with a Spellbinder die.  I used chalks to give the face, arms, and legs a little flesh color and the flower stems some green.  Everything else is colored by using paper piecing.  It took a bit to cut out all of the little pieces but I love the way it came out.  I am sure you can tell I was stuck with the phone camera tonight, but I promise to come back with a better picture as soon as the daughter returns from the beach with the camera.


The image has a little chalk sponged onto the edges and then I layered it with foam tape on top of another die, cut out of the blue and white plaid.  I used the same cardstock from the paper piecing to create the colored rectangles in the background and layered them on the blue and white plaid cut out with a Nellie Snellen dies.  I used a little of the yellow and a Martha Stewart border punch to create the little floral border on the bottom.  The sentiment is stamped in denim ink on a die cut piece of the yellow.  I added a piece of acetate die cut with the same die, added yellow ink to the edges, and layered it over the top to give it a glossy, sunny look.  The shine did not show up in the picture.

For final touches I added three little buttons - two by the sentiment and one on top of the bow at the bottom.  The ribbon and bow is some of the seam binding we colored yesterday.  I have to say that this piece is probably the most boring color I did but it matched perfect.  

Here is a picture of some of the beautiful colors we created.  You can see one of April’s on her card here and some of Bonnie’s on her tag here.

This card is entered in the following challenges:
Delightful Challenges – Anything Goes
Magnolia Down Under Challenge #101 – Acetate/Transparency
Stamp Challenges - Something with Pretty Papers
Corrosive Challenge #121 – Ribbon and Bows
Sentimental Sundays Challenge #59 – “Summery or Sparkly” (plus a sentiment)


Tuesday, June 21, 2011

Hot Fun In The Summer

Today has been a wonderful day.  I actually woke up early (very unusual for me); packed up all my play things; picked up my friend, April; and head up to the mountains to visit our friend, Bonnie.  She has a wonderful studio where we can spread out and have fun.  We had all recently ordered some of the so very popular seam binding.  We only bought white but used reinkers to color it.  We had so much fun and could hardly stop.  It came out so beautiful and I can’t wait to use it.  Needless to say, we need to order more.  I will post pictures soon.


While we were there, I did take some time to finish this card.  I do not have a lot of paper from Basic Grey, though I love them.  I have had this one pack, that I really love, for a long time and decided to use some of the cardstock for this card.  Their theme for this week is a color theme – hot pink, lime green, and brown/craft.  I started with a craft card base and added a layer of the pink cardstock with the edges rubbed with dark brown ink.  On top of this is a brown layer and then the brown, pink, and green polka dot cardstock.  I sponged the edges with lime green to bring it out a bit more.

For the image I used E2306 Sweet Lemonade from Impression Obsession.  I stamped and embossed it in dark brown and colored it with my Tombow markers.  Then I cut it out with a Spellbinder label die and sponged the edges with lime green ink.  This is popped up with foam tape onto a dark brown Spellbinder label.  I added two pink rectangles (sorry they kind of look red), layered on dark brown, to the top left and bottom right corners.  Before adding them I ran them through an embossing folder and sanded the embossed image to create the lemon slice borders.  I also used a Martha Stewart border punch that I just bought, to create the strip of butterflies.  I sponged the edges with lime ink and placed it diagonally through the center of the card.  I layered the image in the center, on top of all of this.

I added the sentiment, which was embossed in brown and cut out with a die, then sponged with lime green ink and a little dark brown ink.  I added some sparkle glitter to the image and the butterflies.  For some reason the picture makes it look very white, almost like sugar, but it really doesn’t look that way – it really just sparkles.  Then I added three dark pink buttons on the top left side.

This card is entered in the following challenges:
Basic Grey Challenge #46 – Hot Pink, Lime Green, and Brown/Kraft
Delightful Challenges – Anything Goes
Impression Obsession Challenge – “Hot Fun in The Summer”
The Shabby Tea Room Challenge Week #67 – Classic Patterns (Using Colors from Inspirational Photo and Polka Dots and/or Gingham)


The Stamp Challenges – Something with Pretty Papers
Charisma Cardz Challenge #24 – Pink and Green
Kaboodle Doodles Challenge #72 – Food and/or Drink
The Pixie Cottage Challenge #74 – Sketch and/or Grab a Glass of Lemonade


Sentimental Sundays Challenge #59 - “Summery or Sparkly” (plus a sentiment)
Totally Papercrafts Challenge #71 – Die Cuts and Punches
Totally Stampalicious Challenge - Use Something Old, Something New! (Old – Papers/New – Punch)
Art Impressions Stamps Challenge #20 – Buttons and/or Bows

Monday, June 20, 2011

Swirls and Pearls

Update:  I have corrected the photos, now that I was able to download them.  These should be better than in the original post.  Thank you for your patience.


Just a quick card that I played with, trying a couple of different techniques.  My card is inspired by several different challenges including a photo, a sketch, and a color theme.  I used some pink decorative paper to represent gingham and did paper pleating, using my mini ScorIt, and added it to the left side of my card.  Then I used a Spellbinder die to cut out some green polka dot cardstock and tucked this just under the paper pleating.  The die I used reminded me of the shape of the cupcake papers in the photo inspiration below. 

I used the Elegant Filigree Oval image from Sweet Stamps for my image.  I embossed it in white onto pink cardstock, and then trimmed it just around the framed area.  I stamped and embossed it three more times using the pink gingham paper, the green polka dot cardstock, and some vellum.  I cut the center of the image out of the vellum, using a Spellbinder scalloped circle nestability and layered it over the image on the pink cardstock.  Then I cut out the flowers and leaves from the embossed pink and green and layered these on top of the vellum image.  I used some foam tape to pop the flowers up a bit.  The idea was a combination of “paper piecing” and the “Spotlight Technique”.  In the spotlight technique you actually add color to only a section of your image, usually in a circular area that will stand out.  I used the scalloped circle for this and added my color with the paper piecing.  Though it may not stand out quite as much as the usual spotlight technique, I still liked the effect it gave.

To finish the card, I ran a light pink jeweled swirl on the right side.  Then I added some sheer pink polka dot ribbon across the center, tying it together on the far right side.  I layered a thin, green, polka dot, triple loop bow on top of that and added a pink, polka dot button and a large white pearl.  I used foam tape to pop the image on top of the ribbon on the left and added small white pearls to the image swirls on the frame.  All of this gave a real mixture of elegance and fun.

This card was entered in the following challenges:
Sweet Stamps Challenge #19 – Embossing/Heat or Dry
Totally Gorjuss Challenge 85 – Pearls and Swirls
Delightful Challenges – Anything Goes
The Shabby Tea Room Challenge Week #67 – Classic Patterns (Using Photo Inspiration Colors, and Polka Dots and/or Gingham)


Thursday, June 16, 2011

Mark That Page

Our Daily Bread Designs Shining The Light Challenge this week was to make a ribbon bookmark.  I have made bookmarks before but never a ribbon one so I decided this would be a fun project to do.


I apologize for my picture – no matter what I did I couldn’t get it to show the colors very well.  Later close ups are better.  I decided I wanted to make something that would hang down the front of a book and be pretty and appealing. 

For the top of the book mark I stamped and embossed the image on some yellow and white decorative cardstock.  The stamp is Butterfly Corner from Our Daily Bread Designs.  The embossing powder I used is Midnight Madness for Sparkle N Sprinkle.  I cut the image out with a Spellbinder flower die.  First I trimmed out the top part of the butterfly so I could run the die underneath it so I didn’t cut it out when I ran the die through my Big Shot.  The shape didn’t show up as distinct as I thought it would so I layered it on a black circle.  The next layer is cut out with a medallion die, using the green back side of the decorative cardstock, and I sponged the edges with green ink  The final layer is actually a deeper rose color, cut out from a larger flower die.  I distressed the edges by sanding them and then sponging them with dark maroon ink.  I stamped and embossed the image a second time, cut out the butterfly, and popped it on top of the first butterfly.  Then I added small pearls around the edge of the image circle.

For the bottom of the bookmark I stamped the sentiment in green on the same decorative cardstock.  I cut it out with a label die, sponged the edges with green ink, and layered it with dimensionals on top of a deep rose colored label die.  To make it a bit more sturdy I layered it onto a larger black label die.

When it came to connecting the two pieces, I realized that I didn’t have any satin ribbon that I thought was wide enough and still the right color.  Most of my ribbon is sheer and I didn’t think that was sturdy enough for a bookmark.  I finally took some white ribbon with green floral design and sponged green ink over it to make it a bit darker.  Then I ran it on top of a wider strip of lace.  I tucked both ends between layers.  I think I will give this to my daughter when she goes to college to remind her to have faith and hang in there.

This bookmark is entered in the following challenges:
Simon Says Stamps Challenge – Bingo (Shape, Ribbon, and Sentiment/Shape, Lace, & Flowers)
Stamp Challenges – Something Punched
Catch The Bug Challenge – Pearls and Lace
The Crafty Pad Challenge 125 – Just Because You Can (made for someone just because they deserve it or you just wanted to send them love)
Kaboodle Doodles Challenge #71 – Use Flowers as Your Main Focus
Totally Stampalicious – Anything Goes
Whoopsie Daisy Challenge – Free and Easy

Wednesday, June 15, 2011

Your Berry Special

Monday was my birthday and I turned “29” again.  It was a great day and I truly felt loved.  I woke up late because I had stayed up very late the night before, playing in my stamp room.  After getting a hot cup of coffee, I checked my e-mails and found messages from all my wonderful friends.  Throughout the day I received text messages from several family members, even my sister that was in the middle of moving out of her home because it is destined to flood later this week due to flood gates being opened in Iowa.  I also received several cards in the mail, and then one of my great friends, Bev, took me out for lunch.  She is one of my only friends that loves Thai food so that is what we ate.  We did some shopping, finished with ice cream, and I headed home to celebrate with my husband.  It was his birthday, too, and we had planned to go out, but neither of us was really hungry.  Instead we had more ice cream later in the evening and went out to eat tonight.  When I first started dating my husband and he told me his birthday was the same as mine I made him show me his driver’s license to prove it.  I thought he was just giving me a line but he was telling the truth.  One more fact before we get to the card.  My husband and I have the same birthday four years apart.  Both of our girls were born on Dec. 30th four years apart on my mother-in-law’s birthday.  My husband’s grandmother also had 2 grandchildren born on her birthday.  Do think it is hereditary?


Ok, now what you have waited for.  With all the summer challenges lately and then Simon Says Stamps Challenge wanting fruit, I could not resist using another adorable House Mouse stamp.  It was just perfect for these themes.  I started working on this on Saturday.  One of my other great friends had taken me for a birthday lunch that day, since she had jury duty on Monday, and then we went to her house to play a little.  I showed her what I was working on and she quickly pulled out a stamp with the perfect sentiment.  Thank you, April!!

I stamped the image in black, colored it with Tombows, and cut it out with a Spellbinder Label die.  I used dimensionals to pop it to a slightly larger maroon label.  This is layered onto two different pink decorative papers with a white card base.  I used some light pink cardstock and punched two strips with a border punch for the top and right side of the card.  I cut out an extra strawberry and popped it up on the image and then I stamped the sentiment in black on the bottom left side.

To give this card a little bling I used a glue pen and some very sparkly red glitter from Sparkle N Sprinkle to add the little seeds to the strawberries and also on the two border strips.  I added three pink flower brads to the bottom right side.  To help them stand out a bit more I sponged a little Stazon ink around the edges and then added a deep pink jewel to the center of each.  Too bad our strawberries are out of season already or I would be tempted to go pick some.

This card is entered in the following challenges:
Simon Says Stamps Challenge – Let’s Get Fruity/Photo Inspiration


The Shabby Tea Room Challenge Week #66 – Pink Lemonade”/Pink,
  Green, Neutrals, and Flowers


Totally Stampalicious – Anything Goes
Whoopsie Daisy Challenge – Free and Easy

The Good Ol' Days

Since my husband snuck a peek at the card I had made him, I decided to make another one for him.  Actually his birthday was on Monday (same as mine) and Father’s Day is around the corner, so I really needed another card, plus one for my dad.  I think I have made more masculine cards this month than I have the rest of the year.  It has been fun since masculine cards seem harder to make and it has been a good challenge.

This card started with a piece of glossy cardstock and I brayered ink from a multicolored ink pad.  I shifted it down a bit half way through and it gave a great blending of the colors.  I ran it through a new embossing folder and then sponged the edges and the embossed image with black Stazon ink.  This really brought out the man with the umbrella.  Using more black Stazon ink I stamped the car image which is a 1905 Buick Model C from Sparkle N Sprinkle.

I added some white hi-lites with a white pen and added three brads to the top right.  I just bought these brad on Saturday and loved how they went with this card.  I layered this onto cream cardstock, then dark brown.  This is added to a brown plaid decorative cardstock that is also layered onto dark brown and finally onto a cream card base.  Maybe I will actually surprise the hubby this time (and it is still a Buick – his true love).

This card was entered in the following challenges:
Paper Play Challenges Week 23 – Father’s Day/Man’s Card
Aifactory Challenge #084 – New  (brads)
CES Challenge #40 – Inspired by a Movie (Singing in the Rain)
Craft Us Crazy Challenge #10 – Father’s Day and/or Masculine Colors/Theme
Crazy 4 Challenges CRC91 – Make a Masculine Card or Project
Fussy and Fancy Friday Challenge – Card for Male or Boy
Incy Wincy Designs Challenge 98 – Father’s Day/Masculine
Ooh La La Challenge #82 – Father’s Day/Special Man
Sentimental Sundays Challenge #59 – Father’s Day/Masculine Card
Sew Many Challenge #56 - Father's Day/Made Card
Creative Craft World Card Crazy Challenge - Brads (3 or more)